
FDM vs SLA
LCD Revolution
The Anycubic Photon
Chemicals and Environment
A Universe of Things
More Chemicals
UV Cure
Verdict
Pros and Cons
Resin Printing Shopping List
3D printing isn’t exactly new. About 25 years ago, when I was a fledgling 3D scanning technician, I got to see a number of different technologies in a burgeoning “Rapid Prototyping” industry.
Back then you could make things in plastics, resin and even glued-together sheets of laser-cut paper profiles. But there was one common factor about the machines and the services that offered them.
They cost a small fortune.
Not only were the machines expensive (usually five figures expensive), but the materials they used added to a crippling running cost, keeping them out of the reach of hobbyists.
FDM vs SLA

Fast-forward to today and even the average Joe Bloggs on the street has heard of 3D printing, and you can buy a pretty proficient entry-level printer for well under £200/$260.
Many of the new wave of 3D Printing enthusiasts come from the tabletop gaming community, where the draw is often the printing of box inserts, game components and scenery for wargames.
However, it’s only quite recently that the most popular printers – the Fused Deposition Modeling (FDM) systems that extrude plastic filament in layers – have been able to print the holy grail of game components: miniatures.
That said, although some FDM models can yield staggeringly good results at this, they rely heavily on tailored print profiles to maintain fidelity of the detail of these tiny sculptures.
Fortunately the communities that support 3D Printing are some of the most supportive around, and users share the print profiles, system settings, tips and hints to help others reproduce their own successes in this field.

For many though, it’s still a hit and miss affair, and even the best FDM results can’t really hold their ground against those produced by their resinous cousins.
Traditionally, resin models were created using Stereolithography apparatus (SLA) that used light in a variety of ways to cure each layer of a build. This was often done with lasers for the best results, but such systems, although very accurate, were also some of the most expensive.
This hasn’t changed much today with lasers commanding the bigger bucks for absolute fidelity in reproduction. However, there’s been a relatively recent, cheap-n-cheerful gatecrasher to the resin party in the form of LCD printers.
LCD revolution
I say “recent” even though some of the earliest SLA systems were LCD based, but it’s only very recently that such systems have appeared aggressively priced for the hobbyist/home market.
LCD systems still use resin but without the expense of curing lasers. Instead they cure each layer of resin using a UV profile projected onto an LCD screen, rather than drawing the profile out with a laser.

This is a relatively simple process: a build plate sandwiches a layer of resin between it and the transparent plastic film at the bottom of the resin vat at a user-specified layer thickness (usually 0.05mm by default).
The screen under the vat projects its profile, cures the layer, the build plate rises, detaching the layer from the bottom of the vat, then lowers for the next layer and repeats.

Thus all that’s needed is a small 2K screen, a vat with a film base, a metal build plate and a z axis (up/down) lead screw to move it. Apart from a USB/SD Card port and a power-supply, that’s pretty much it and means that LCD printers are cheap. Very cheap.
Where even basic laser SLA units often cost upwards of $3000, LCD systems are coming in at $500. Some are even $250. This places them in the same price range as FDM printers, meaning they’re affordable for the average hobbyist.
There is a trade-off in quality between laser SLA and LCD, although the latter does also give you some batch-creation pay-offs.
The Anycubic Photon
First seen in 2018 the Photon from Chinese firm Anycubic immediately caused a stir, with its small footprint, aggressive pricing and stunning results, and for many it remains the go-to printer for hobbyists wanting to break into resin printing.
I had been looking for a 28mm miniature-capable printer for some years, so snapped up a Photon in an Amazon sale for around £320 ($412). I was a little nervous as despite being around 3D printers for a couple of decades, I’d never owned one.

A couple of days later my printer arrived, in a relatively small box. Whilst most FDM printers come as a kit, or at the very least require several components to be bolted together.
In comparison, lift away the protective packing around the Photon (don’t throw this away – more on that later) and apart from attaching the build plate with a single knurled screw and sliding in the resin vat, you’re good to go.
All that’s left to do is level the system via the rotating feet, and plug it in. That’s around 15 minutes from opening the box. Even less if you’ve watched a few YouTube videos first.
Before you can start printing though, there’s one more step to take in your machine preparation, and that’s setting the Z=0 height for your build plate (basically its start point at the bottom of the resin vat).
Following the manual‘s instructions (which are actually great compared to many Chinese-manufactured tech products) this process too is quick and painless and only requires an allen/hex key (included), an A5 sheet of paper and a couple of minutes of your time.
That done it’s time to pour in some resin and start printing.
Chemicals and Environment

It’s at this point you realise resin printing is a very different beast to extruded plastic. With the latter you just feed the end of your filament into the print head and away you go. There might be a little bit of a smell as the filament softens, but its still a process you can safely carry out in a study, workshop or spare bedroom.
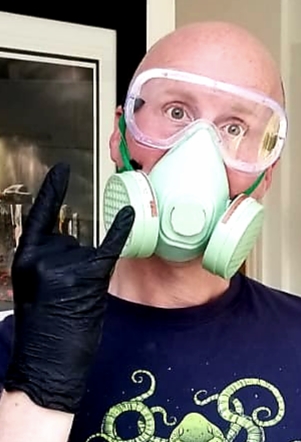
With resin the first thing you do is don your nitrile gloves, eye protectors and face mask. Resins are not nice chemicals to get on your skin, and certainly not in your eyes or mouth.
What’s more, they stink, so if you or your family are sensitive to this kind of smell (you get headaches using oil based paints, for example) you’ll want to isolate your printing in a well-ventilated (or extractor fan equipped) room, or an outside garage or shed.
Fortunately I have a tiny utility room at home, so I evicted my wife’s bread maker and moved in. There’s also a steel draining board and sink which come in handy for your post-print processing (more on that later too.)
Of course all this might mean you have to rethink buying a resin system altogether, but if you have the right space, then within 20 minutes from opening your box, your system and build plate are levelled, your resin is in the vat and you’re ready to rock’n’roll.
A Universe of Things

Included with the Photon is a USB stick with a test 3D file preloaded. This comes in STL (stereolithography) format, which has been the industry standard for many years.
You can go ahead and print this file if you like, but personally I couldn’t wait to start printing more exciting fare. I’m fortunate in this respect, as I was involved in 3D scanning for a couple of decades, so have a huge library of funky models to choose form.

However, you don’t need this kind of 3D background, or indeed any budget at all to start printing cool models and 28mm+/- gaming miniatures.
Thingiverse is a huge database of free, user-uploaded STL models where you can find everything imaginable, including a huge variety of gaming miniatures, components and scenery.

Although one of the best-known it’s by no means the only source of free models, with sites like MyMiniFactory and Cults3D. There are even sites letting you design your own 28mm models, like HeroForge, but you will have to pay for the STL files.
So to get the very best models, you’ll probably need to pay for them, but there really are some spectacular models available for free here, and you can easily spend many hours just surfing through the database and downloading GBs of 3D data. You don’t even need an account.

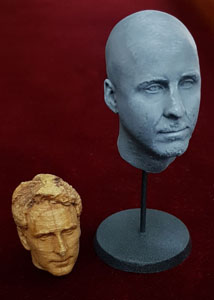
For my first print I settled on a 3D selfie – a head scan of me I had knocking around my own archives. I imported this into the supplied software, auto-generated some supports (which cradle overhangs in your model to stop any drooping or breaking duriong the print process), used the default settings and hit Slice.
Five minutes later and I was plugging in the USB, selecting my model on the screen and hitting Print. And away it went. About 4 hours later, the Photon gave a confirmatory beep or two and my print was done.
More Chemicals
At this point it’s time to go Breaking Bad and don your gloves, mask and eye-protectors again, not just because your finished model and the build plate has a lot of uncured resin all over it, but you’re going to be using isopropyl alcohol to clean it off.*
Again, this means handling pretty unpleasant chemicals and yet more noxious vapours. It’s also pretty messy – although it gets progressively less so as you gain experience in this post-print processing stage.
I tend to have two or three bottles of isopropyl for this. The first is a “dirty” mixture that has quite a bit of resin from previous cleans in it. I use this to do a preliminary rinse or two to get the worst of the resin off the build plate and models, flushing it into a receptacle which is then poured back into the bottle.

I’ll then repeat the process with my two other bottles of iso: the “slightly dirty” second mix, and finally a pretty much clean rinse, each time doing two or three flushes over the models and build plate.
Only then do I remove the model using a sharp metal scraper form a DIY store (the included plastic one is a bit crap, especially for models more tenaciously stuck to the build plate). In fact recently I’ve been using a long box-cutter blade to slide under the support raft and pry things loose.
Once your model is free you can give the build plate a final wipe down with a paper towel and some clean iso, reattach it to the system and move onto the final stages of post-processing.
*It’s possible to buy specialist resin cleaners such a Monocure’s ResinAway, but they’re less freely available than iso and will cost you more, although in the long run you’ll probably use less and they’ll work out cheaper. The advantage of bespoke cleaners is that with transparent resins there’s far less chance of your prints turning a little cloudy during their iso bath/cure.
UV Cure

LCD printers work by using UV to cure photoreactive resin, so to fully cure your models you need to give it more UV exposure.
The simplest way to do this is to pop them on a window ledge in bright sunlight, but for those of us in the Northern hemisphere where such conditions are often variable, it’s worth investing in something like a UV nail-polish curer, which you can pick up for about $20.
I usually cure stuff for about 10 minutes or so, and only then remove the supports, which are pretty brittle by this point and usually break away easily.
If all has gone to plan, you should now have an amazing model, which just needs to the kind of preparation any model needs prior to painting, so scraping/filing away any support marks (they’d be mold lines on an injection-moulded mini) and spray undercoating.
Verdict

Before passing judgment on the Photon, I need to make a point about resin printing in general: it’s not eco-friendly.
A lot of the plastics used in FDM printers these days will break down pretty efficiently. In fact if you want to print things for outdoors use, you have to use more specialised materials.
What’s more there’s none of the additional chemicals and materials needed for resin production. No isolpropyl, disposable nitrile gloves, rolls of paper towel etc. Compared to FDM, SLA/DLP is incredibly wasteful.
That said, In my experience with FDM printers, there are a lot more failed prints and discarded material generated through levelling tests etc. Plus Anycubic has just announced the release of a plant-based resin, which is completely biodegradable, has less odour and is altogether less toxic and unpleasant to deal with.
Now, let’s talk usability and performance.

I’ve owned my Photon for several months, and couldn’t be happier. It was simple to set up (and break down again – I just pop it back in its original box and stow it in the attic if the utility room is required), the documentation was good, the software simple and the results stellar.
Sure, I’ve had some print failures, but relatively few, and all of them down to my own mistakes in prepping the 3D files, rather than any system shortcoming.

The successful majority of results are nothing short of spectacular. I still can barely believe they came from a machine costing so (relatively) little. Just two or three years ago I simply couldn’t have imagined getting results like this for the price, or even owning my own home resin printer.
That said, there’s no escaping the down-sides. Resin is smelly, toxic and requires a specialised space, and yet more toxic chemicals and additional kit to process the results.
Is it worth it? I guess it depends.


If you’re looking for a quick and easy solution to producing your own minis, with relatively little set-up and experimentation, you have the space for the system and the clean-up equipment, and you don’t mind investing in the more build material and supplies of gloves and isopropyl, then look no further.
However, if your budget is more limited and you just want your 3D printing set-up to share space with your office/painting desk/games table, then there’s no denying you can achieve pretty good mini printing results with many FDM printers, some for almost half the price.

That’s not to say folk don’t run Photons in their home offices, but you might want to print out some modifications from Thingiverse to vent the smell and vapours outside.
If you do go the FDM route, the print bed is much larger, allowing you to create much more ambitious projects without having to print models in pieces, or blanch at the potential resin costs.

But if all you want to produce is minis (or small scale scenery) and you want the best quality, then resin really is your best route. At least at the moment.
Although the build plate is more restricted, because of the nature of the process (a single layer exposed and cured at once, regardless of size), printing multiple minis of the same size takes no longer than just printing one.
With FDM your print times increase in line with the size of the project, and in order to reproduce the detail you require for miniatures, you may find your print times for even one mini are far longer than the same mini created in resin.
There’s also way less moving parts in a Photon than the average FDM, which makes it a more reliable option too.
Frankly though, if you have the budget for a Photon, splash an extra $150 or so on an entry level FDM printer too!
Oh, and the best place to buy the Photon at the moment? Direct from Anycubic’s online store, for a jaw-droppingly low $259!

UPDATE: Anycubic recently released the Photon S, an upgrade with twin Z-axis lead screws to aid in stability and a number of other design and firmware tweaks. We haven’t yet tested the new machine so can’t comment on how it compares to the original, but the great news is that standard Photon prices have now dropped to under $300, as Anycubic will no doubt look to faze out the older model… and quite frankly you’d be insane not to snap one up while you still can, as chances are you won’t see much difference in the models either of the systems produce.
Pros:
- Amazing value-for-money.
- Quick and easy set-up out of the box.
- Brilliant results.
- Already well-established, sizeable communities.
- Plenty of resin types to choose from.
- No increase in print times for extra minis of the same size.
- Quicker than printing a comparable resolution on an FDM printer.
Cons:
- Smelly, toxic resins.
- Quite messy until you get experienced.
- Resin more expensive than plastic filament.
- Additional toxicity and expense in post-print processing.
- Additional UV cure equipment advisable.
- Not particularly eco-friendly.
Resin Printing Shopping List
Beyond a good supply of paper towel, this is a list of stuff I’ve ended up investing in over the past few months – these are the actual products that I’ve bought after some serious research, so I think I’ve found the best bang for buck! (Affiliate links)
- Isopropyl Alcohol: Your use of this will go down as you get more experienced, but it’s worth getting a 5L container of it.
- 1.9 litre Plastic containers: I use 3 isopropyl baths for post-processing – Dirty for cleaning the plate and print as it comes out of the printer, a Middle for where prints go when I remove them from the build plate, and finally a Clean bath where prints finally go while I clean the plate (also with iso from this bath), before they go in the curer.
- UV Curer: Ideally with resin you want to cure your prints not too close to the UV light source, as too intense a light can cause some discolouration. With minis though it’s less of an issue as you’re probably going to be undercoating and painting them. Nail curers are cheap and work well. I find the tube version works a bit better than the LED version, but they’re both functional, and the LED one I got did at least have more headroom, so i still use it.
- Mask/Respirator: You get a surgical mask with the printer, which functions fine to stop resin or iso splashing in your mouth, but a quality respirator mask will cut out a lot of the smell of fumes too and make the whole clean-up process a lot less unpleasant.
- Goggles: If you wear glasses by all means just keep them on to protect your eyes, but there’s no side protection at all, and for the sake of a few quid, just get yourself some lab spec ones. You could always combine your goggles and mask into one unit for the full Breaking Bad look!
- Nitrile Gloves: These are the best ones I’ve found. They fit good, are pretty robust and yet let you feel everything through your fingertips. Good price too.
- Box Cutter Blades: Many people use a scraper. You get a plastic one with the Photon that’s next to useless. With these long craft blades you can easily slide them under your print and detach it from the plate, and also avoid gouging your build plate with a metal scraper, which is the oft-advised alternative.
- Extra filters: You get a few filters with your system, but you’ll want more. As well as filtering your resin when you empty your vat to change resin type/colour, you should do the same if you have a failed print.
- Funnel: You can get away with just holding a filter in place when draining your vat back into the resin bottle, but seriously, just get a funnel. You can even prop your vat up at an angle using it, while you do other clean-up tasks.
- Screen Cleaner: It’s important to keep the projection screen on the system free from dust and crud. So clean it with something custom-made not to leave smudges or scratch that precious glass.
- Extra resin: you get a small bottle of Anycubic’s transparent green resin with the system, but that will be gone in short order. I’ve found Elegoo resins to be good value and excellent performance.
- Solar Turntable: This lets you make the most of the free UV in the sky when it’s around, curing your model in a sunbeam plus powering the turntable at the same time. They can also be useful for turning the model in a bespoke UV curing oven Plus they’re good for taking beauty shot videos of your new creations!

